Exposure Compensation
Flash
Depth of Field control - distance to subject, etc
Posing
Using distortion
Wednesday, March 30, 2016
Tuesday, March 15, 2016
Bridges Photo University
Before we start consider this: Photography is a pattern of observation and showing others your vision with whatever tools you have at your disposal. It's about being resourceful and creative with what you have and thinking on your feet. Solving problems. Getting around limitations. Learning something new each time you go out shooting. The truth is, there is never a perfect session, but your viewer doesn't have to know that. Look for things that are interesting. Start looking for details. Look for something clever that others may miss. Photography teaches you to see the world around you in a different and more beautiful way. Remove the blinders and have fun. Shoot the way you want, show why you are unique.
This all may sound very pie in the sky, but what if you only have a cellphone? Great starting point. You have a camera that goes with you everywhere and can capture better photos than most point and shoots a few years ago. Have you ever posted a photo on Facebook? Instagram? You've already started showing your friends and people all over the world your vision. Let's fine tune a few things to make sure they getting the full effect of what you are trying to convey.
This all may sound very pie in the sky, but what if you only have a cellphone? Great starting point. You have a camera that goes with you everywhere and can capture better photos than most point and shoots a few years ago. Have you ever posted a photo on Facebook? Instagram? You've already started showing your friends and people all over the world your vision. Let's fine tune a few things to make sure they getting the full effect of what you are trying to convey.
Chapter 1: Basic Composition – from iPhones to DSLR’s
Bad habits
to break:
#1 Shooting everything at eye level.
This applies to all cameras, but should be on the top of your list if you want
your cellphone shots to improve. Shooting eye level is the most boring
perspective you can provide the viewer. This is the view everyone sees anyways
so try to take a second and see if there’s another way you can shoot your
subject. Think about what is eye level
for your subject – get on your knees for pets and kids. Lower the camera
for food. Kneel down to headlight level for cars. Move the camera/phone around
til you find an angle that’s cool. Move around constantly to get different
perspectives and looks during events. Shoot from all sides, lay on the ground,
get on a ladder.
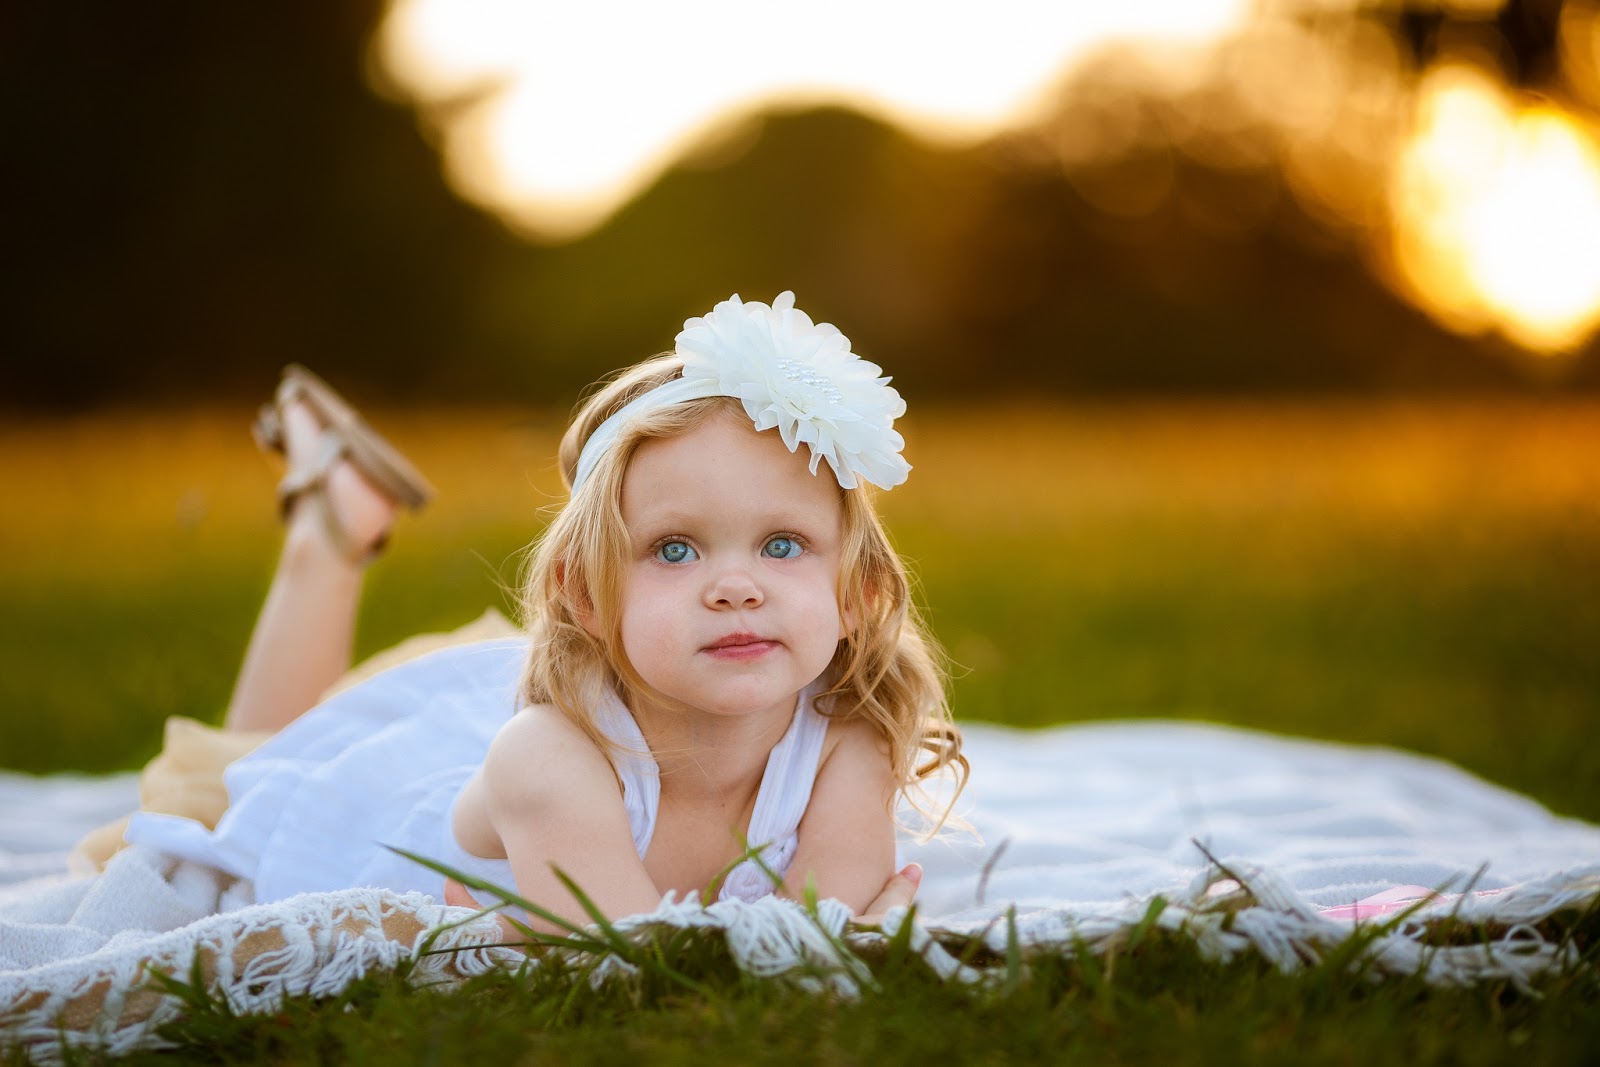
*the big exception to this rule is people. Eye
level or higher is more flattering for portraits.
#2 Horizons/Lines not straight. This
is a close runner up to #1. Take an extra second to make sure your horizon is
straight or if your subject is man-made, try your best to get it level. This is
something that can be corrected later, but best to try to do it right the first
time.

#3 Blurry shots. Make sure you are
holding the camera/phone as still as possible in low light situations. Use two
hands and try to brace yourself against a wall, prop your elbows on a table, even
set the phone on something, etc.

#4 Putting your subject in the center.
Naturally as symmetrical (mostly) people, we have a habit of subconsciously
wanting to create things that are also symmetrical. Putting your subject off
center will create a more interesting photo.
iPhone - Go to “settings” – Photo & Camera – Grid On. See rule of
thirds below.
#5 Shoot first, think later. All the
above boils down to this. Take a moment to think about what you are doing. Take
a few shots, don’t settle for just one.
**Think
of what is interesting about the scene and focus on that. Shoot it in an
interesting/unusual way. – this is the
key to more interesting/better shots.**
Some composition rules to start.
Your subject – Biggest, Brightest,
Sharpest. This is a biggie that
you should always keep in mind. Your eyes are drawn to objects in a photo that
have these three traits. If you can help
it, look for backgrounds that are darker than your subject or contrast with
your subject (think color and texture too – smooth car with brick or rock
background, people and trees). If your subject is getting “lost” in the
background, move closer.
Rule of thirds


This is a
great place to begin. As mentioned just above, moving your subject off center
can create a more dramatic composition. When your subject is centered, your eye
immediately goes to the subject and then stops. When you move your subject off
center, you create a sense of motion that is more interesting to the eye. Your
eye naturally goes to the intersection of each of the gridlines first in an
image. If you place your subject in the rule of thirds crosshairs, your eyes
will be drawn to your subject immediately, then move thru the rest of the photo
and then back to your subject. Another tip is to have your subject look into
the negative space in the photo. Here the puppy is facing the negative (empty) space and located along
the right gridline.


When center
is better – sometimes there are situations where center is ok. Most of the time this would
apply to man-made objects. Shooting the front of a car head on is an example
(taking care to make sure you are shooting from the exact center to avoid
distortion). Or an architectural element that has a perfect symmetry. In the example
photo, centered works because the photo is symmetrical and also, your eye
follows the length of the bright white table as you eye moves thru the image.


Shoot low, shoot high, shoot close - Like we talked about above, varying where you shoot from (rather than just shooting at eye level) will make a big difference in your shots. Shooting at "eye level" with your subjects will help more clearly define your subject as well as giving us a view that we don't normally see day to day. Our other tendency is to want to capture the whole scene. We see a car and we want to take a picture of the whole car. We see an animal and we want the whole animal in the photo. Getting closer will force you to create a more interesting composition.
Often detail shots can help more clearly define an atmosphere for an event than a broad wide angle shot. Thinking of weddings - focusing on custom signs, centerpieces, jewelry, clothing can help give you the sense of the occasion.
Often detail shots can help more clearly define an atmosphere for an event than a broad wide angle shot. Thinking of weddings - focusing on custom signs, centerpieces, jewelry, clothing can help give you the sense of the occasion.


A Word on Backgrounds
You should
pay as much attention to your background as you do your subject. Your
background will either compliment your subject or detract from it. No in
between. Look for things like signs, telephone poles, other people, parked
cars, etc when composing your shot. Sometimes you can move around your subject
and use them to block the distractions. Look for clean backgrounds – natural or
man-made patterns.
Here the trees in the background as well as the light gray sky contrast the dark black clothes, but the same time match the mood. The blurred background from the wide aperture also contrasts the sharpness in his details. The gray tone of the sky and overall darkness of the clothes help match his serious expression and makes for a melancholy, moody shot. Imagine if there was a bright sunny/yellow glow to the sky, would this shot work as well? Probably not.
Here the trees in the background as well as the light gray sky contrast the dark black clothes, but the same time match the mood. The blurred background from the wide aperture also contrasts the sharpness in his details. The gray tone of the sky and overall darkness of the clothes help match his serious expression and makes for a melancholy, moody shot. Imagine if there was a bright sunny/yellow glow to the sky, would this shot work as well? Probably not.

Smooth glossy paint contrasts with the rough texture of the brick, even tho they are in the same color family.

Chapter 2: iPhone/cell shots
Settings –
Photo/Camera - Grid On – use rule of thirds. Place your subject in the
“crosshairs” of the grid for good placement/composition.

HDR Auto –
this will allow the camera to quickly take multiple photos and blend to create
a range with High Dynamic Range. This
would allow an outdoor scene to be properly exposed for the sky and also the
landscape/person.
HDR off:


Do not zoom,
move your feet – The digital zoom on your iPhone just crops the photo as you
take it, so just move closer or take the shot and crop later. You will end up
with blurrier shots if you try to zoom.
HDR off:

HDR on:

Focus – tap
screen to focus, slide up and down to change exposure

Touch "sun" icon after selecting focus and drag up and down to change exposure.

Use the timer button for low light situations or action shots. Can set it to trigger in 3 seconds or 10. Camera takes a burst of 10 shots. Pick the sharpest and delete the rest.

Touch "sun" icon after selecting focus and drag up and down to change exposure.

Use the timer button for low light situations or action shots. Can set it to trigger in 3 seconds or 10. Camera takes a burst of 10 shots. Pick the sharpest and delete the rest.


Chapter 3: Intro to post processing
If you are
interested in basic editing, the iPhones come with a decent editing program in
the photo album that lets you adjust exposure, contrast, etc without going to
another program.
Some
cellphone editing programs: VSCO, Pixlr, Flickr, etc.
If you are
interested in editing on the computer, I recommend going with Adobe Lightroom
CC and Photoshop. Adobe has a Creative Cloud subscription for $9.99 monthly that allows
you the newest versions of each program. Killer deal since Photoshop alone is
usually $600+. Also Lightroom is available as a mobile app once you sign up for
the subscription.
Lightroom allows for batch editing which
is a huge advantage over Photoshop*. You can apply the same settings to 2 or
thousands of photos at once. Each photo may or may not need additional tweaking, but batch editing allows you to keep a consistent feel to a set of images. Save your favorite group of settings as "presets" and use them to create different looks for your photos. Cons: Import/Export can be confusing at first. Cloning
and layers are cumbersome to use. I use this program for 98% of all I do. *To be fair, Photoshop does allow you to batch edit RAWs but it's not as polished as LR to use.


Chapter 4: Basic Camera Gear Intro
Basic Camera Body Genres:
Phones – “The best camera is the one you
have with you”.
Pros: super portable, with you all the time, surprisingly good image quality for the size.
Cons: Not great if you view them at any size larger than the screen, not really print quality, low resolution.
Pros: super portable, with you all the time, surprisingly good image quality for the size.
Cons: Not great if you view them at any size larger than the screen, not really print quality, low resolution.
Point and shoots – These are phasing out
quite a bit due to cellphones, but pretty much the same pros and cons.
Bridge camera – These are smaller than
DSLR’s but larger than point and shoots. They are usually sold with a
non-removable lens that power zooms in and out. Image quality is usually on par
with a point and shoot. Mostly sold in
big box stores. Not really recommended as they are generally overpriced for what they are.
 Mirrorless – This is the fastest growing
segment in gear right now. Mirrorless cameras delete the traditional mirror and
pentaprism of the DSLR and usually use a rear digital viewfinder or large LCD
screen in lieu of a viewfinder.
Mirrorless – This is the fastest growing
segment in gear right now. Mirrorless cameras delete the traditional mirror and
pentaprism of the DSLR and usually use a rear digital viewfinder or large LCD
screen in lieu of a viewfinder.
Pros: smaller than a DSLR, but larger than a point and shoot, usually pack a large sensor in a small body, very good image quality for the size.
Cons: Battery life is generally poor, expensive if you want the newest, autofocus can be slow on some models, so most are not recommended for sports or fast moving subjects.

Crop DSLR – This is what most people buy
when they buy their first DSLR but there are several tiers of quality for each
brand. Canon Rebel, Canon 70D, Canon 7D are examples. They are called Crop
Sensor because they have similar qualities to full frame, but a smaller or “cropped”
sensor. Full frame cameras use the same size sensor as traditional 35mm film. Therefore, focal lengths are also calculated by that standard. To calculate the 35mm equivalent focal length on a crop lens = 1.6 x focal length. For
example: 1.6 x 18mm (wide end of kit lens) = 28.8mm equivalent on full frame.
10mm on a crop would be like 16mm on a full frame camera.
Pros: Lightweight compared to larger full frame cameras, accept a large variety of lenses (for Canon they accept every lens made except film lenses), crop specific lenses are less expensive, very large bang for the buck factor, high resolution sensors, usually have very good autofocus systems that cover most of the sensor.
Cons: image quality falls short to full frame, but sometimes not by much, ISO noise is tougher to deal with.

Full Frame DSLR – These are usually the
top tier models offered by Canon and Nikon – Canon 6D, 5D, 1DX, Nikon D4, D810.
These have a large sensor so ISO noise and resolution are better than crop.
Pros: Image quality is very good with great colors, contrast, sharpness, clarity, etc.
Cons: Cost, size, weight.
(below crop on left, full frame on the right. Look at the mirror in the center of the opening and you will see the size difference in the sensor)
Pros: Image quality is very good with great colors, contrast, sharpness, clarity, etc.
Cons: Cost, size, weight.
(below crop on left, full frame on the right. Look at the mirror in the center of the opening and you will see the size difference in the sensor)


Advantages
of Crop over FF: More “reach” out of telephoto lenses. “More pixels on target”.
Macro. Motorsports. Deeper depth of field at the same aperture/shutter speed.
Medium Format – Top of the line
commercial camera, setups usually cost $30k+, Larger sensor than Full Frame,
shows lots of detail on a high resolution sensor.

Interchangeable Lenses:
Wide: Under 50mm, shows the whole scene.
Great for landscapes and interiors.
Crop recommendations: Canon 10-18 ($300), FF: Canon 17-40 f4L ($500 used)
Crop recommendations: Canon 10-18 ($300), FF: Canon 17-40 f4L ($500 used)

Standard: 50-60mm Good for an all-in-one
lens if you like this perspective. Not really wide, not really telephoto. Also
called “normal” perspective. Distortion is similar to what the eye sees.
Crop recommendations: Sigma 30 f1.4 ($300), FF (also good for crop): Canon 50mm 1.8 STM ($120)
Crop recommendations: Sigma 30 f1.4 ($300), FF (also good for crop): Canon 50mm 1.8 STM ($120)

Telephoto: Anything over 50-60mm. My
favorite. Flat perspective is more
flattering for portraits. Great if you don’t want to be right in the middle of
things (or can’t). Lets you capture candid moments more easily. Also great if
you are restricted to a certain area and can’t move – ie concert, motorsports
event. May be limited indoors.
Crop recommendations: Canon 50 1.8 STM ($120) Canon 55-250 STM ($150)
FF: Canon 85 1.8 ($350) Tamron 70-300 VC ($300), Canon 70-200 f4L IS ($1000 used)
Crop recommendations: Canon 50 1.8 STM ($120) Canon 55-250 STM ($150)
FF: Canon 85 1.8 ($350) Tamron 70-300 VC ($300), Canon 70-200 f4L IS ($1000 used)


Pros: Allows flexibility in a many different situations. Can frame shots how you like without physically moving, most have image stabilization built in.
Cons: Weight, smaller aperture than primes = slower shutter speeds in low light.
Popular zoom combinations:
Crop 18-55/55-250, 10-18/18-55.
FF: 24-70/70-200, 24-105/100-400

Primes: Fixed focal length, so no zoom. Forces you to move around to get
the composition you want. Primes are in their "prime" (sorry) - meaning that they only have to be calibrated to one focal length, unlike a zoom that has to try it's best at several different focal lengths. Primes usually have less glass elements than zooms meaning that there are less glass imperfections between your subject and your camera's sensor. Imagine looking thru one piece of foggy glass, you can probably still make out details, now imagine having several layers of foggy glass and trying to see an image. That's primes vs zooms in a nutshell. Primes are generally sharper, have better color, and weigh less than zooms.
Pros: Usually have very large aperture so you they are useful during both outside and inside, usually lightweight compared to a quality zoom, image quality, sharpness, color, all the very best. Killer bokeh (out of focus areas).
Cons: Very few have image stabilization. Can be limiting in situations where you are restricted on one area, narrow depth of field caused by large aperture can be tough to get focus right, usually need to be used in pairs, so you may need to change lenses more often or carry two bodies.
Popular prime combinations: Most prime shooters use primes in 2 or 3 lens combos - usually a wide paired with a telephoto. 35/85, 24/50/100, 35/85/135, etc.

Below are one prime (left) and one zoom (right). Primes have one gripped ring that moves to manually focus (not needed if using autofocus). Zooms have two - one to change focal length, the other to manually focus (once again, not needed if using autofocus).
*below is the combination that I shoot most outdoor events with. 24-105 f4L on one body, 135 f2L on the other. Zoom covers wide to telephoto.*

Macro: Usually primes with fixed focal
length. Have a very short minimum focus distance to allow you to photograph
small objects like insects, jewelry, food details, etc. Most lenses are limited
by how close they can focus in these situations, these lenses specialize in
getting close. Most macro lenses are very sharp even at normal ranges and can
be used as portrait lenses. Recommendation: Canon 50 f2.5 ($200) Tamron 90 f2.8 ($500 non-VC model),
Canon 100 f2.8L ($800).


When shopping for new lenses, they will be listed like this: Canon EF-S 18-55mm f3.5-5.6 STM IS. So what does that jumble of acronyms, letters, and numbers mean? Canon is the brand. EF-S is the lens format – whether it is for full frame or crop. EF-S is for crop, EF is for full frame. 18-55mm is the focal length range. It starts at 18 (wide) and goes to 55 (telephoto). It has a maximum aperture of f3.5 on the wide end and f5.6 on the telephoto end. STM is the type of focus motor used. It ranks like this: micro drive (older lenses and usually not listed in lens description), STM (stepping motor), USM (ultrasonic motor, best of the range).IS is Canon’s Image Stabilization system. These lenses have a floating element in the middle of the lens that moves to counteract movement from lens shake. Most lenses are good for 2-3 stops (so you could shoot at 200mm at 1/25-1/50 of a second if your subject is completely still.) Canon EF 24-105 f4L USM IS– Canon makes it, it is for full frame, focal length range is 24 (wide) to 105 (telephoto) has a maximum aperture of f4 thru the whole range (wide to telephoto) and uses the ultrasonic motor. It’s an “L” lens which is Canon’s pro line/”luxury” line. L lenses have the best focus motors, best glass and top of the range image quality and a red ring around the lens. Image Stabilized.

Chapter 5: How a Camera Works: Film to Digital

Light
travels thru lens, mirror reflects image up into viewfinder, photographer
composes shot, presses shutter, mirror moves down and out of the way, shutter
opens, burns film, shutter closes, mirror moves to original position. Some
cameras allow this all to happen in 1/8000 of a second. Crazy right?
Film is
light-sensitive material. White/bright areas reflect more light so burn the
film in those areas more. Dark areas don’t reflect as much, don’t burn film as
much. This creates the negative (white areas turn black, black are white), the negative
is used to create prints by shining light thru negative onto print paper,
duration of burn onto film paper determines exposure.
Film ISO:
100, 400, 800 common film speeds. The higher the number, the more sensitive the
film is to light (ie 100 would be good outdoors where there is a lot of light
(burns slower), 800 or more would be good indoors where there is less light(burns
faster)). Your goal is to use the minimum
amount of ISO for an acceptable shutter speed. As ISO increases, color,
sharpness, dynamic range, and clarity all suffer. High ISO photos will look
grainy and will have odd color. Low ISO photos will have a clear, clean look.
Digital:
Digital sensor replaces film. Captures light in a similar way without the need
for material for each exposure. Digital also allows us to change ISO on the fly
without having to change rolls of film.
Lenses work
like the human eye. Our brain has a “correct exposure setting”. Our brain
controls our pupils to regulate how much light comes into our nerve
receptors. When we are outside, our
pupils get smaller to counteract the harsh light. Indoors, our pupils get
larger to allow more light in. On a lens, aperture (like our pupils) is the
opening in the lens that the light travels thru. The lens has curved internal
blades that move to either close down the opening or move towards the edges of
the lens to create a wider opening. The wider the aperture, the more light can
travel thru at a given shutter speed. Aperture is notated in stops (more on
that later) and is measured like gauges of wire. The lower the number, the
wider the aperture and more light will pass thru to the sensor/film. For
example f2 is wider than f4, so if ISO setting and lighting conditions are the
same, aperture setting of f2 will have a much faster shutter speed than f4.
Fun fact, the eye opens to f2.1 in low light situations and contracts to f8.3 in bright light.
Fun fact, the eye opens to f2.1 in low light situations and contracts to f8.3 in bright light.


Remember, this is only when you need an exact shutter speed. You can always reduce the ISO and close down the aperture (like f8-f22) in Av mode to slow down your shutter speed and show motion.

Manual mode: Buckle your hat on, you
have full control and you better be paying attention. All settings are at your disposal. Use dial near shutter to manage aperture, back dial for shutter speed. ISO controlled by dedicated button. Varies by mode. Great for:
tripod work, constant lighting situations (think dark reception hall), panoramas. Bad for:
Casual shooting, situations where light changes a lot.
I really discourage you from shooting in this mode unless you really have to to achieve the look you need.
How to change focus points in Av, Tv, Manual mode. If you do nothing, the camera will select the focus point it thinks you want. The camera looks for the closest object with the most contrast to the rest of the scene. This can be pretty ambiguous, so it's better to take matters into your own hands. Use the button with the "checkerboard pattern". Use the dials to rotate around until you find the focus point you want. Some cameras have a joystick on the rear that can be used to move focus points. If they are all red or illuminated, this means that the camera will select the focus point. If you move the dial and a single AF point is illuminated, it means that the camera will only focus in that one spot.
The center AF point is the most sensitive point, so it's the one you want to use in low light situations and the one to switch to if you other focus points are having a hard time locking on. Try to put the focus point on an area of contrast - like a person's eye (there are different colors and textures there for the focus point to lock onto) or an edge of a manmade object. Focusing on an area with no texture or edges will make it harder for the camera to get a lock on what you are shooting.
I shoot in Ai-Servo mode which means that the camera is constantly tracking whatever is at the focus point you selected instead of getting a lock and stopping. This mode is great for general shooting and awesome for tracking moving kids, motorsports, pets, etc.


*The Nitty Gritty of how this all works together*
The exposure triangle.

So as you
can see, ISO, Aperture,
and Shutter Speed are all dependent on one another. Change one and you may need
to make an adjustment on the other two to keep the exposure correct. We will
get more on this later. Just keep the example handy.
“Stops” are how we identify changes in the
amount of light the film/sensor is receiving.

1 stop = 2x as much light or losing a stop means ½ as much light. ISO and Shutter speed are fairly easy to calculate. To get a stop more light, multiply the current setting by 2. So gain another stop of light at ISO 800, you would need to go to ISO 1600. Same with shutter speed. 1/30 second to 1/60 of a second is a stop faster.

1 stop = 2x as much light or losing a stop means ½ as much light. ISO and Shutter speed are fairly easy to calculate. To get a stop more light, multiply the current setting by 2. So gain another stop of light at ISO 800, you would need to go to ISO 1600. Same with shutter speed. 1/30 second to 1/60 of a second is a stop faster.
Aperture is
trickier and you have to multiply in an odd way. See above for common
apertures. If you want to gain two stops of light, divide your current aperture
setting by 2. F8 to f4 is a difference of 2 stops. To go down 1 stop at f2.8 means going down to
f2. Memorize the stops if you want to/have time/want to look cool at parties/maybe
not look cool at parties. Knowing the relationship and how it affects shutter speed is more important than knowing the exact stops. Your camera will let you scroll between these stops too, for example, you can shoot at f6.3 (in between f5.6 and f8).
Pro tip: No
camera is very good indoors. Cameras are not as sensitive as our eyes. Imagine
seeing the world with sunglasses on all the time. Flash and lenses with large
apertures (F1.2, f1.4, f1.8, f2) will help.
Let’s break down each of the points on the
exposure triangle:
Aperture: The opening that light travels
thru. Aperture allows you to set how much of a scene you want in focus. The
smaller the number, the less that will be in focus. The larger the number, the
more will be in focus. Think of the number as how many objects will be in focus. So f2.0 will only have a small portion of the scene in
focus (think portrait with a blurry background). F11 will have all of the scene
in focus (think landscape with a field in the foreground and mountains in the
background, all sharp). Opening the aperture up (smaller number like f2) also
means that you will get a faster shutter speed since you are letting more light
in.
Some Aperture terms and definitions:
Depth of Field (DOF) - Means the depth of sharpness in your image. Is only one object sharp? This would be a narrow depth of field since only a small part of the image is in sharp focus. Is the whole photo sharp (like a landscape)? This would be a great/large depth of field.

Bokeh is the area of the photo that is out of focus when you are using a large aperture like f2.
In the photo below, the area that is blurry and out of focus intentionally is bokeh.
 So how do you get more bokeh? Set your aperture for the widest it will go (lowest f number like f2) and if you are using a zoom, set it on it's most telephoto setting (if using 18-55 lens, set at 55). Get closer to your subject and move them further away from the background. Small objects are easier to get bokeh out of. Larger objects like full body photos are harder to get without a telephoto prime with a large aperture.
Example: So let’s say you are taking a portrait on a sunny day and you want the background blurred. You set the camera to f2.0 in Av mode and take the shot. Your settings are f2.0, 1/4000 shutter speed, ISO 100. You decide that you want to include the whole scene in your photo (say there’s a pretty downtown skyline background). You set the aperture to f11 (5 stops slower) and leave the ISO the same, your settings now are f11, 1/125, ISO 100.
Some Aperture terms and definitions:
Depth of Field (DOF) - Means the depth of sharpness in your image. Is only one object sharp? This would be a narrow depth of field since only a small part of the image is in sharp focus. Is the whole photo sharp (like a landscape)? This would be a great/large depth of field.
Bokeh is the area of the photo that is out of focus when you are using a large aperture like f2.
In the photo below, the area that is blurry and out of focus intentionally is bokeh.

Example: So let’s say you are taking a portrait on a sunny day and you want the background blurred. You set the camera to f2.0 in Av mode and take the shot. Your settings are f2.0, 1/4000 shutter speed, ISO 100. You decide that you want to include the whole scene in your photo (say there’s a pretty downtown skyline background). You set the aperture to f11 (5 stops slower) and leave the ISO the same, your settings now are f11, 1/125, ISO 100.

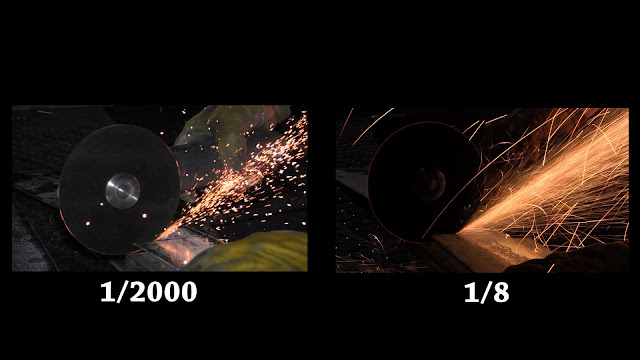
Shutter speed: How long the shutter
stays open to capture the light needed for a correct exposure. A faster shutter
speed will get you a sharper photo. Blurry shots are caused by slow shutter
speeds and movement from you slightly shaking the camera, your subject moving,
or both. You can show motion by setting the camera up for a slow shutter speed. Let’s say that you are on a hike and you pass a fast moving stream and
want to get a cool moving water shot on a sunny day. You have the camera in Av
mode since you have been taking landscape photos along the trail. You take a
photo and the settings are24mm f4.0, 1/1000, ISO 100. You like the exposure, but
the water movement is frozen due to the fast shutter speed. You change the
camera in Tv mode and set the shutter speed to 1/30 to get some blur in the
water. You brace yourself and take the shot. You check your settings again and
they are 24mm f22, 1/30, ISO 100.
Some rules of thumb for shutter speed: people subconsciously "wiggle" when trying to sit still. No one is ever perfectly still. To eliminate this movement, you will need a shutter speed of 1/200 or higher (also see the inverse focal length rule below if using a telephoto) . For sports and fast action, you will need a shutter speed 1/500-1/1000.
Some rules of thumb for shutter speed: people subconsciously "wiggle" when trying to sit still. No one is ever perfectly still. To eliminate this movement, you will need a shutter speed of 1/200 or higher (also see the inverse focal length rule below if using a telephoto) . For sports and fast action, you will need a shutter speed 1/500-1/1000.
ISO: Your
goal is to use the minimum amount of ISO to get an acceptable shutter speed. Think
of ISO as your shutter speed accelerator or brakes. If your shutter speed is too
low and your aperture is where you want it, up your ISO. If your shutter speed is
too fast, lower your ISO.
The more ISO you use, the faster your shutter speed will be. However, the trade off is that with more ISO, there is more "noise" in the photo. Noise is the grain and miscolored pixels that you see in a photograph taken in low light. It's the image equivalent of static that you may hear in old records. This is something that can't always be avoided (like shooting an event indoors at night with no flash), so it's better to have a grainy photo than a blurry one.
The only ways to reduce your ISO usage for a cleaner image are: Use a wider aperture if possible, use a flash, or use a tripod to steady the camera for non moving objects (buildings, landscapes, etc. People are not non moving objects, we all wiggle even if we are trying to stay still).

Shutter speed in general
Inverse focal length rule: so what’s
the point of all this? To get the look and shutter speed to make sure your
photos are sharp or intentionally blurry. So what if you want to just take
good, sharp photos?
Well keep the inverse focal length rule in mind. Say you are using a FF camera with a lens that has a focal length of 35mm, 1/35 (you would round that off to 1/30) would be the slowest shutter speed most people can handhold without a tripod or image stabilization. Keep in mind, this is the minimum. You will want to rip off several shots by trying to keep as still as possible and holding the shutter button down until you get 3-5 shots. Delete the blurry ones and keep the sharpest. So to move to the telephoto side, if you are shooting at 400mm, you are looking at 1/400 as a minimum.
If you are shooting with a crop sensor, just double your focal length to get the correct minimum shutter speed. So if shooting at an indicated 50mm on the lens on crop, shoot at 1/100 sec at minimum.
Ideally,
when you start shooting, you should take a test shot and see what your settings
are looking like. If you are below the minimum, you need to either open up your
aperture more and/or bump up your ISO.
My strategy when shooting is to use Av mode
and set the aperture where I want it. Then I use ISO to manage my shutter
speed.
If you take a look at this rule, it makes sense why you would want a fast, wide prime indoors or in low light. Shooting telephoto indoors requires you to have a faster shutter speed and the light isn't always available to do this. I like using my 35mm f2 prime indoors since I can get sharp shots at 1/30 of a second, whereas I need 1/125 of a second or faster to get sharp shots with my 85mm f1.8 prime. This equates to needing 2 stops more light for the 85 vs the 35 in the same light. Or you wouldn't need as high of ISO in the same situation. For example, if I am shooting at 35mm, f2.2, 1/30, ISO 800, I would need settings of 85mm, f2.2, 1/125, ISO 3200 in the same lighting conditions. So my photos will look more grainy with the 85mm and less grainy with the 35mm in the same light.
If you take a look at this rule, it makes sense why you would want a fast, wide prime indoors or in low light. Shooting telephoto indoors requires you to have a faster shutter speed and the light isn't always available to do this. I like using my 35mm f2 prime indoors since I can get sharp shots at 1/30 of a second, whereas I need 1/125 of a second or faster to get sharp shots with my 85mm f1.8 prime. This equates to needing 2 stops more light for the 85 vs the 35 in the same light. Or you wouldn't need as high of ISO in the same situation. For example, if I am shooting at 35mm, f2.2, 1/30, ISO 800, I would need settings of 85mm, f2.2, 1/125, ISO 3200 in the same lighting conditions. So my photos will look more grainy with the 85mm and less grainy with the 35mm in the same light.
Example 1: You are shooting with a 135
f2L in Av mode and hop out of the car to take a pic of a car in a parking
garage. You take a quick photo and check your settings. Current settings are f2.0, 1/60, ISO 100. To get an acceptable shutter
speed you will need to boost you ISO up to get a faster shutter speed. Going
from ISO 100 to 200 (one stop) would double your shutter speed (1/125). That’s
still not quite enough, so you will need to go up another stop. Double the ISO
from 200 to ISO 400 gets you a shutter speed of 1/250. Bingo.
Example 2: This rule also works in
reverse. You have been shooting a wedding inside all day with the 135 f2L in Av
mode with high ISO. You want to take a pic of the happy couple leaving their
reception and it’s super bright outside. You take a test shot outside. Current
settings are f2.0, 1/8000 (your camera’s max shutter speed), ISO 1600. With the large amount
of light, very sensitive high ISO setting, and large aperture, it would be like
sleeping in a dark room and then immediately opening your eyes to a sunny sky.
In this case, you could drop your ISO down a ton to get a more acceptable
exposure and shutter speed. Dropping your ISO down to 100 would give you 4
stops slower shutter speed (1600 to 800, 800 to 400, 400 to 200, 200 to 100).
This will drop the shutter speed 4 stops (1/8000 to 1/4000, 1/4000 to 1/2000,
1/2000 to 1/1000, 1/1000 to 1/500) to a more acceptable shutter speed range.
This will give you a cleaner, less noisy image with plenty of speed to keep
your image sharp.
***I know this
probably all sounds crazy technical, but practice and get
comfortable. It will take some time in real world shooting for it all to click,
but I promise, it will become second nature after a while.
Chapter 6: File types: JPEG vs RAW
Check your camera's menu and look for "Image Quality"

JPEG – always shoot in JPEG Large (with the smooth edge vs the stairstep edge) to
have the highest resolution JPEG file. JPEGs are good if you do not want to do
a lot of editing after taking the photo. Good for: casual shots, experimental
photos, saving space on your computer.
RAW – data file that includes the
highest possible resolution and dynamic range possible. Dynamic range is the amount of detail that a camera can capture in both shadows and highlights at the same time. Has to be interpreted
by an editing program to convert to a JPG that can be viewed. RAWs will take
some work to get what you want, but the full (highest resolution possible) file
is there for you to use. Good for: low light situations, heavy contrast
(landscapes/portraits where there is a bright sky), important moments (portraits,
weddings), when you have time or presets to work the files.
Use RAW if you want the best image quality,
color, etc and have time to edit.
I shoot in L JPEG + RAW. This allows me to separate the files into two folders (one for JPEG, one for RAW) after shooting. I then review the JPEGS with Photo Viewer (program that is on pretty much every PC) and decide which ones I want to keep, delete the rest, then match up the file names with the RAW files and delete the unneeded RAW files. Import the RAW files into Lightroom and edit. This allows you to skip the step of converting the RAW files to JPEG to review and then going back and editing them. Saves about half the editing time or more.
I shoot in L JPEG + RAW. This allows me to separate the files into two folders (one for JPEG, one for RAW) after shooting. I then review the JPEGS with Photo Viewer (program that is on pretty much every PC) and decide which ones I want to keep, delete the rest, then match up the file names with the RAW files and delete the unneeded RAW files. Import the RAW files into Lightroom and edit. This allows you to skip the step of converting the RAW files to JPEG to review and then going back and editing them. Saves about half the editing time or more.
50mm 1.8 (ideally STM), Extra
battery, Bag or case, Circular Polarizer (Good = Tiffen, Better = Hoya, Best =
B+W), Dolica tripod.
Chapter 8: Recommended Settings – General
Landscape – Av
mode, f8-11, shutter speed dependent on light, ISO 100 + tripod. This will allow
you to have a great depth of field (remember, more in focus) to capture elements in the foreground and
also background.
Portrait –
Av mode, f2.0 (or widest aperture you can), shutter speed dependent upon light,
ISO dependent on light to keep 1/200 shutter speed or higher. It’s impossible
for you or your subject to stay completely still. 1/200 is fast enough to
freeze small movements.
Action
outdoors – Av mode, f2.0 (or widest aperture you can), shutter speed 1/500 or
higher, ISO to keep shutter speed a 1/500+
Panning
outdoors – Tv mode, f8-f11, shutter speed 1/50-1/200 depending upon speed, ISO
100
Indoors – Av
mode, f2.0 (or widest aperture you can), shutter speed 1/100 or higher, ISO
800-3200+ depending upon available light.
General ISO
settings:
50-100
outdoors mid day, lots of light
400 cloudy
or shooting in shade
800 evening,
sunset time where it’s starting to get dark
1600-3200+
indoors
Some examples with settings included:
5D + 24-105 f4L. 24mm, f5.6, 1/400, ISO 400. Shot in Av mode and processed in LR. Outside, cloudy

5D + 35 f2. 35mm, f2.2, 1/400, ISO 400. Shot in Av mode and processed in LR. Inside, large window providing light.

5D + 135L. 135mm, f2.2, 1/8000, ISO 400. Shot in Av mode and processed in LR. Outdoors, bright sun. ISO did not need to be this high. Could have easily used ISO 100 - shutter would have been 1/2000.

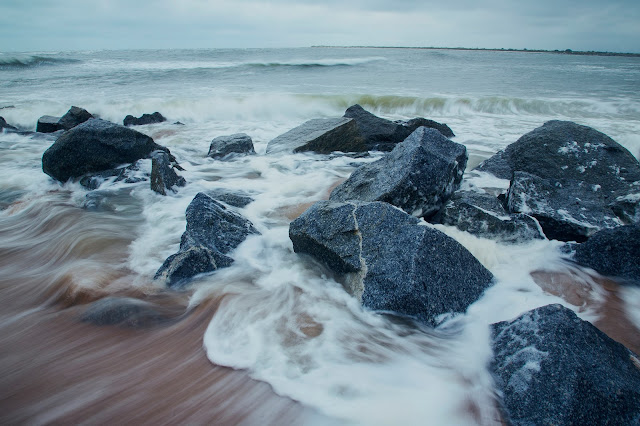
5D + 24-105L. 24mm, f18, 1/5, ISO 50. Shot in Tv mode and processed in LR. Handheld in ankle deep moving water. I leaned on the Image Stabilization built into the lens to steady the shot. Took lots of shots here. Most were blurry, but some were sharp.

5D + 24-105L. 24mm, f18, 1/20, ISO 50. Shot in Tv mode and processed in LR

5D + 24-105L. 24mm, f18, 1/5, ISO 50. Shot in Tv mode and processed in LR

5D + 135L. 135mm, f2.0, 1/800, ISO 200. Shot in Av mode and processed in LR. Sunset

5D + 35 f2. 35mm, f4.0, 1/200, ISO 800. Shot in Av mode and processed in LR. Indoors, ambient light from windows.

5D + 135L. 135mm, f2.2, 1/125, ISO 1600. Shot in Av mode and processed in LR. Indoors, could have used a faster shutter speed, but I got lucky.

6D + 85 f1.8. 85mm, f1.8, 1/125, ISO 12,800. Shot in Av mode and processed in LR. Indoors, very low light. Aperture and ISO maxed out. ISO grain was partially removed in post process (noise reduction). Black and white makes high ISO noise less obvious.

6D + 24-105L. 24mm, f4.0, 1/15, ISO 1000. Shot in Av mode and processed in LR. Indoors, very low light. Instead of raising my ISO a lot here, I relied on the IS in the lens to stabilize the shot. I wanted to show the venue, not the people, so motion didn't matter here.

5D + 135L. 135mm, f2.2, 1/320, ISO 1600. Shot in Av mode and processed in LR. Indoors low light ambient, spot light on subject.

Canon Rebel XS (crop sensor) + Tamron 28-75. 28mm, f2.8, 1/40, ISO 100. Shot in Tv mode and processed in Photoshop. Shot just past sunset. This is a roller shot - meaning two cars travel the same speed side by side. Lower shutter speed to show motion in the wheels and background while car is sharp. Taken at approximately 40mph.

Canon 7D (crop sensor) + Canon 70-200 f4L IS. 127mm, f32, 1/15, ISO 100. Shot in Tv mode and processed in Photoshop. This is a panning shot. Photographer stands still as the object moves past. You rotate your body and camera to track the subject. Part of the car will be sharp, but the wheels and background are blurry. For this shot, you can see I am well outside of the inverse shutter speed rule. I was leaning heavily on the IS to see how far I could push it. About one in every 15-20 come out sharp when you are shooting this slow.

Canon 7D (crop sensor) + Canon 70-200 f4L IS. 200mm, f14, 1/30, ISO 100. Shot in Tv mode and processed in Photoshop. This is a panning shot again. Use center focus point in heavy tracking situations like this since it is the most sensitive focus point on your camera. Once again well outside of the inverse shutter speed rule, but came out pretty striking with the amount of blur and the colors of the car versus the drab background.

Canon 7D (crop sensor) + 24-105L. 24mm, f18, 1/30 ISO 100. Shot in Tv mode, processed in LR. Panning shots don't have to be all telephoto either. This uses a wide angle to bring more the environment into the shot. Using a wider focal length also means that I have a higher chance of a keeper rate compared to a shot like directly above.

Some examples with settings included:
5D + 24-105 f4L. 24mm, f5.6, 1/400, ISO 400. Shot in Av mode and processed in LR. Outside, cloudy

5D + 35 f2. 35mm, f2.2, 1/400, ISO 400. Shot in Av mode and processed in LR. Inside, large window providing light.

5D + 135L. 135mm, f2.2, 1/8000, ISO 400. Shot in Av mode and processed in LR. Outdoors, bright sun. ISO did not need to be this high. Could have easily used ISO 100 - shutter would have been 1/2000.

5D + 24-105L. 24mm, f18, 1/5, ISO 50. Shot in Tv mode and processed in LR. Handheld in ankle deep moving water. I leaned on the Image Stabilization built into the lens to steady the shot. Took lots of shots here. Most were blurry, but some were sharp.

5D + 24-105L. 24mm, f18, 1/20, ISO 50. Shot in Tv mode and processed in LR

5D + 24-105L. 24mm, f18, 1/5, ISO 50. Shot in Tv mode and processed in LR

5D + 135L. 135mm, f2.0, 1/800, ISO 200. Shot in Av mode and processed in LR. Sunset

5D + 35 f2. 35mm, f4.0, 1/200, ISO 800. Shot in Av mode and processed in LR. Indoors, ambient light from windows.

5D + 135L. 135mm, f2.2, 1/125, ISO 1600. Shot in Av mode and processed in LR. Indoors, could have used a faster shutter speed, but I got lucky.

6D + 85 f1.8. 85mm, f1.8, 1/125, ISO 12,800. Shot in Av mode and processed in LR. Indoors, very low light. Aperture and ISO maxed out. ISO grain was partially removed in post process (noise reduction). Black and white makes high ISO noise less obvious.

6D + 24-105L. 24mm, f4.0, 1/15, ISO 1000. Shot in Av mode and processed in LR. Indoors, very low light. Instead of raising my ISO a lot here, I relied on the IS in the lens to stabilize the shot. I wanted to show the venue, not the people, so motion didn't matter here.

5D + 135L. 135mm, f2.2, 1/320, ISO 1600. Shot in Av mode and processed in LR. Indoors low light ambient, spot light on subject.

Canon Rebel XS (crop sensor) + Tamron 28-75. 28mm, f2.8, 1/40, ISO 100. Shot in Tv mode and processed in Photoshop. Shot just past sunset. This is a roller shot - meaning two cars travel the same speed side by side. Lower shutter speed to show motion in the wheels and background while car is sharp. Taken at approximately 40mph.

Canon 7D (crop sensor) + Canon 70-200 f4L IS. 127mm, f32, 1/15, ISO 100. Shot in Tv mode and processed in Photoshop. This is a panning shot. Photographer stands still as the object moves past. You rotate your body and camera to track the subject. Part of the car will be sharp, but the wheels and background are blurry. For this shot, you can see I am well outside of the inverse shutter speed rule. I was leaning heavily on the IS to see how far I could push it. About one in every 15-20 come out sharp when you are shooting this slow.

Canon 7D (crop sensor) + Canon 70-200 f4L IS. 200mm, f14, 1/30, ISO 100. Shot in Tv mode and processed in Photoshop. This is a panning shot again. Use center focus point in heavy tracking situations like this since it is the most sensitive focus point on your camera. Once again well outside of the inverse shutter speed rule, but came out pretty striking with the amount of blur and the colors of the car versus the drab background.

Canon 7D (crop sensor) + 24-105L. 24mm, f18, 1/30 ISO 100. Shot in Tv mode, processed in LR. Panning shots don't have to be all telephoto either. This uses a wide angle to bring more the environment into the shot. Using a wider focal length also means that I have a higher chance of a keeper rate compared to a shot like directly above.

Subscribe to:
Posts (Atom)